Last Updated on March 5, 2015 by Steve Hogg
This post is not about Triathlon, but about road TT’s and to a lesser extent, track. Triathlon position will be discussed in the near future.
I hope you had a laugh or at least smiled a bit. While Rod is an exaggerated version of equipment junkies that we all know, there is substance to what Bikefitter said to Rod. Riding a good TT essentially comes down to power output over drag. You want to punch the smoothest hole through the air while putting out the maximum power that you can sustain. Less drag for the same power equals faster road speed OR more power for the same drag figure equals faster road speed. Increase drag or reduce power without an improvement in the other parameter and you will not ride as fast. So aero is good but it has to be balanced against the ability to produce power. There is no prize for the most aerodynamic position, only for the fastest elapsed time. There is such a thing as being so aero that the rider cannot maintain the same road speed as a less aero but more powerful position. So what influences the twin necessities of high output and low drag from a bike fitting point of view?
The factors that influence output are: Leverage, Breathing Efficiency and Control of Movement. The factors that influence drag are: Bike Position and Equipment Choice. Many of these factors are interrelated but I will attempt to explain them, one at a time. Affecting all of these is Functionality which will be covered last.
Leverage on the pedals is determined by cleat position, crank length and seat position in the main. Any of the methods of cleat position outlined in the Power To The Pedals post will work well for a TT, but the longer the TT, the more the rider should consider Method 3. But only if they ride with Method 3 all of the time. Failing that, if the rider is a TT specialist , or if they have a pair of shoes that they use specifically for TT, I would advise that they move your cleats as far back as is possible providing that they can at least achieve Method 1. Further back than Method 1 is fine because though the sprint jump will potentially suffer, this isn’t a concern for TT riding. The further back the cleats relative to foot in shoe (providing that they are not placed further back than Method 3); the lower the peak torque per pedal stroke, but the more degrees of crank arc that the rider can apply force to the pedals. So same total torque per stroke but distributed more evenly throughout the stroke. The result is a lower peak muscular contraction per pedal stroke which results in the production of less fatigue metabolites. A more rearward cleat position allows the rider to sustain a given output for longer. How much longer is subject to wide individual variance. If you plan to ride a different cleat position on your TT bike than your usual bike, you need to make sure that you get one reasonable length ride a week in on the TT bike / shoe combo to maintain the different motor pattern that it will necessitate. If this describes you, then it is also a good idea to ride the TT bike exclusively for period of at least a few days prior to a TT. If you are using the same cleat position on your TT bike as on your road bike, then this is less important.
Crank length have been covered here. The major concern with crank length for TT’s, where many increase their crank length, is that in the last 5kms of a TT, where the rider is likely starting to cook a bit if they’ve had a real go, the crank length should not be so long that the ability to get over top dead centre suffers. This can happen with fatigue if a crank is too long or the rider isn’t sufficiently adapted to that crank length.
Seat position is an area where changes can positively influence the rider’s ability to lower and extend their torso without unduly causing pedaling efficiency or comfort to suffer. There are two schools of thought about that and I’ll get into more detail about that in Bike Position below. At this point, it is worth reading or refreshing your memory with the posts Seat Setback, Seat Height and Addendum to Seat Height.
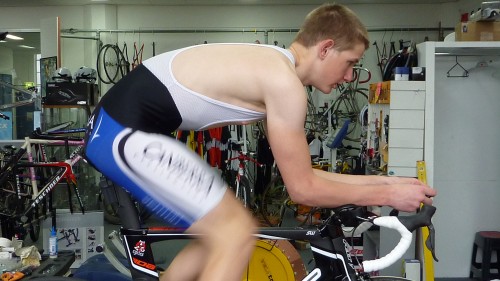
Breathing Efficiency: Your torso is measured from pubic symphysis to sternal notch. When standing as upright as possible, the distance between these two points is your Measurable Torso Length. What I call Effective Torso Length is measured between these same two points when the rider is on the bike. The shorter the Effective Torso Length, relative to Measurable Torso Length, the less room the rider has for the lungs to expand in to, and at some level, there will be a decrease in breathing efficiency because of this. So an aero position has to consider Effective Torso Length. Below is a pic of a reasonably functional rider with good ability to extend his torso.
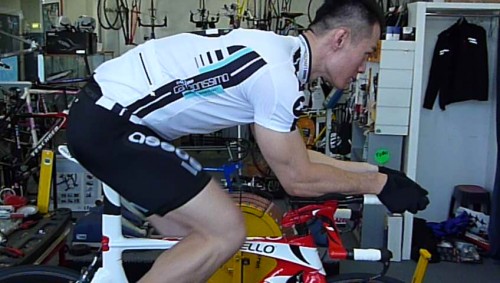
I can almost hear some people say “But he’s not low enough!”. Well the above gent has a touchy neck and we’ve come up with a position that is sustainable. Who said you have to be low to go fast anyway? Below are two very effective TT riders who for various structural and functional reasons could not sit with low torsos. This did not prevent them from being remarkable TT performers.
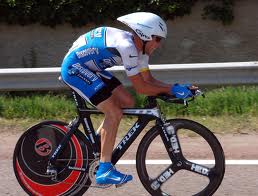
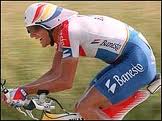
My apologies for the poor resolution. How did these two ride so fast without being low?
They picked their parents well for starters, and they or someone influential to them realised early on that their proportions and functionality precluded them from riding as fast in lower torso positions. TT’s are about achieving a balance between power output and aerodynamics. If being more aero makes you slower in real world testing, then there is no point prioritising aero beyond a point . Better to have a position that allows good power output and refine that basic position to be as aero as possible. I’m digressing. Armstrong has a kyphotic (hunched) upper back and over the years seemed to put a lot of work into extending his torso as well as he could on his TT bike considering the hindrance to torso extension that a kyphotic tendency causes. Indurain above, has reasonably good torso extension but it came at the cost of not having a low aero bar position. I remember reading a piece in an English cycling magazine during Indurain’s heyday where he had booked time with an American cycling aerodynamics expert in the St Cyr wind tunnel in France in a bid to become more aero. The result was a wind tunnel proven aero drag reduction of 15% but a reduction in on road speed as well! Miguel went back to his pre wind tunnel position.
I am not saying that aerodynamics is unimportant. I am saying that it is part of the performance picture, not the entire painting. The higher the average speed that can be maintained, the more important aerodynamics becomes.
Good torso extension helps maintain breathing efficiency but so to does the ability to breathe through lateral expansion of the rib cage. Anyone reading this who stretches should also put some time into stretching their intercostal muscles. At high intensity, any unnecessary decrease in breathing ability will impact on performance. If you cannot expand your rib cage well, you are sacrificing something. How much is an individual thing. Another factor that can negatively affect breathing efficiency is when the rider tries to have their forearms closer together than they can comfortably maintain. Ideally, they need to be within the hip line which is achievable for most with the exceptions being the rare skinny hipped, exceptionally wide shouldered physique. Do what is comfortable, not uncomfortable. At intensity, it is not possible maintain a position that isn’t comfortable without making compromises; many of which hinder performance. Usually the compromise will mean increased enlistment of postural muscles which can only come at the cost of decreased ability to use power producing phasic muscles. The basic message that I’m trying to get across is that TT riding is hard. Don’t make it harder still by limiting ability to breathe by lack of interest in, or time spent on, improving respiratory efficiency.
Control of movement: This should be self evident. A smooth pedaling action is one that can be sustained. There are some people out there who are as rough as guts in their pedaling technique but still perform well, but there is no free lunch. No one ever gets something for nothing. I’ve seen good TT riders who pedal as though they are on a step machine. There aren’t many of them but they exist. They are also the ones who struggle the next day. Riding with jerky technique imposes a cost in terms of fatigue. It may and is possible to ride effectively with less than smooth technique, but it isn’t possible day after day, ride after ride. Fatigue or injury intervene, sometimes sooner, sometimes later. Choose a seat height that is sensible and don’t necessarily think that your seat height should be the same as that of your road bike. Many TT riders can get a lower torso position on their TT bike than on their road bike, but an increased forward lean of the pelvis means a greater stretch on the hamstrings. Offsetting this to some degree is that if the seat has been moved forward, hamstring enlistment decreases somewhat. If the rider has any difficulty with discomfort at the sitbone, high in the hamstring just under the glutes, or behind the knees when riding TT’s at their road bike seat height, then the seat is likely to be too high. It is not a universal rule that seat height needs to drop for TT’s but it does happen, so be aware of the possibility.
Bike Position: The UCI stipulates that the minimum seat setback for a road or track bike (track sprinters aside) is 50mm. I think this rule is seriously flawed for a variety of reason but the fact is, that is the rule. There are schools of thought about TT seat setback. No. 1 is to move the riders seat forward to 50mm behind the bottom bracket and then work on the rest of the position. A tall rider can be proportionally much further forward than a small rider at the same 50mm seat setback because a high seat height that is 50mm back allows a steeper seat tube angle than a low seat height that is 50mm back. There is the ‘anatomic exception’ rule for those of small stature but there are also plenty of seats that meet the UCI’s minimum length requirement that allow the rider to be much further forward than a more conventional seat at the same setback. So most people can sit with a more or less radical forward position if they choose to, one way or another, and still meet the UCI setback stipulation for road and road TT bikes. Many people can’t perform well when too far forward and the description ‘far forward’ has huge individual variance because of the massive range of function and proportion that exists among the cycling population. Below is a tall gent with 50mm of seat setback who rides TT’s very effectively in this position. 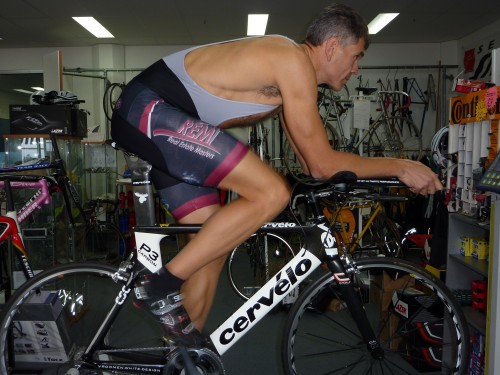
Note too, that he is sitting properly on the seat; not trying to bear weight through the perineum by sitting on the nose of of the seat. So he’ll be able to father more children if he chooses to. So if you want to shove your seat forward to 50mm setback, feel free, but don’t necessarily expect to perform well. Some will, and some won’t.
If you can’t perform at 50mm setback because it is too far forward, then No.2 is the approach to take. No. 2 is what I call ‘Achievable TT Position’. Achievable because it relies less on proportions and function and more on common sense. The gist of it is: Most road riders who ride TT’s only do it occasional , maybe monthly; it isn’t their major training position or riding time. So they have well embedded motor patterns (muscle firing sequences) for the seat position that they hold on their road bikes. However there is an aerodynamic benefit in being lower and more extended in the torso providing it can be achieved without diminishing output. Another factor is that when using aero bars, 4 less major joints need to be stabilised; 2 wrists and 2 elbows, as compared to the drop bar position of a road bike. (The elbows will be stable providing the aero cups are noticeably closer to elbows than wrists). That means the following:
Move the rider forward by 10 – 15mm (occasionally 20mm) more than their road bike seat setback (assuming that they have a good position on their road bike of course!). This will allow the pelvis to flatten somewhat and the torso to extend more. As the pelvis rolls forward, the hip joint, which is below the vertical mid point of the pelvis, moves up and back to an extent, meaning that pedaling mechanics don’t change hugely. They change, but most can adapt fairly quickly. There will be an increased weight transfer forward because seat setback has moved forward and body weight transfers with it, but the rider is better able to bear this increased forward weight bias because it is not as necessary to stabilise the elbows and wrists (or should be stable if properly done). Below is a short clip of an elite rider for whom we took this approach. Despite being a specialist climber, he has finished on the podium in national TT champs. Don’t get me wrong, I’m not taking the credit for his performance; he had to do it, not me. What I am trying to illustrate is that when the rider is functional, they can be as aero as necessary without needing to move radically forward.
There are also riders, particularly small riders, for whom a seat back of 50mm is too much. Seats vary massively in measurement, proportion and where the shape of the seat upper forces the rider to sit, so changing the seat can often allow the rider to sit where desired and still meet the 50mm setback stipulation. Many manufacturers make seats for this purpose to allow riders to ‘cheat’. Currently, the ‘cheat’ seat (that I’m aware of) that is most effective in this regard is the ISM Adamo range
Whichever approach you choose to take, it is imperative that part of the positional picture is having your bars high enough to allow you to comfortably see where you are going. It’s okay to look through your eyebrows a bit but it is not okay to use full neck extension to do it. I have seen numerous crashes in TT’s and tri’s simply because the rider could only comfortably lift their head to look ahead every 30 – 50 metres or so. This post explains the negative neuromuscular and respiratory impact of an unrealisitic aero position in detail. Additionally, I know of one world class road pro who has won multiple world championships on the track but who has permanent and debilitating neck problems caused by spending 4 years in his nation’s Team Pursuit program, where aerodynamics were prioritised above rider care.
Another pic of a rider with a realistic aero position below
Equipment Choice: Depending on what source you read, the rider is more than 90% of the total wind drag on a bike with frame, wheels and other bits making up the rest. Wind drag increases as the square of the increase in speed but the power needed to overcome that extra wind drag increases as the cube of the increase in speed!. Many non elite riders are happy if they can ride 40kms in an hour. That’s great, but to ride 45kms in an hour, that same rider would have to sustain an output 42% higher! To ride at 50kms in an hour requires another 37and bit % increase in power output again! So increasing speed from a reasonable but non elite 40kms an hour to a serious 50kms an hour requires more than a 95% increase in power. It is this disproportionate power requirement for an increase in speed that is the appeal of aerodynamic products and position. There is a limit to any riders sustainable power output, but if drag can be reduced for the same output, then speed increases. So in terms of equipment, where to start?
A pair of aero bars, with the rider well positioned on them, will make more difference than anything else the rider can do to reduce drag. Typically wheels are listed next, but helmets play a part in this too (more about this later) After that it becomes a box ticking exercise with shoe covers, aero glasses, aero bidon etc, etc and you can believe which ever company’s marketing that you choose. You may have noticed for instance, that there are about 6 “most aerodynamic wheelsets in the world” on the market. The question isn’t so much, “Which equipment to use” but more “How do I determine which equipment effectively improves my speed”. You could use a wind tunnel, but they are thin on the ground and in many cases aren’t an empirical test anyway. Or you can use a power measurement system and an indoor velodrome where air temperature and humidity changes aside, you have a baseline environment not subject to changes in wind direction and climatic conditions like the outdoors is. The gent below took that approach and broke a Masters World Hour Record by more than 2.7kms.
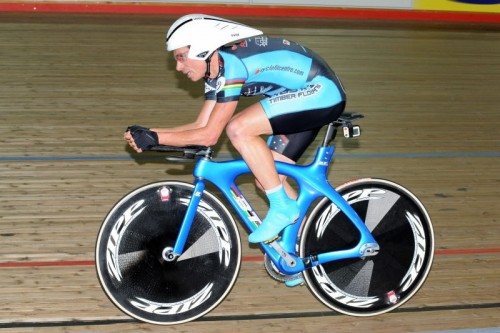
The basic position was subject to endless refinement by the rider, Jayson and his coach Alex Simmons. They used SRM’s to determine which positional and equipment changes yielded the greatest reduction in wattage needed to maintain the projected average speed of 48 point something km/h. Bikefitter told Rod that Secret of Speed is “hard work and attention to detail”. Read this link for an object lesson in how hard work and attention to detail were worth 3.5kms an hour more than Jayson’s previous attempt on this record. One memory that stands out from the process that Jayson and Alex undertook was the difference between two well known aero helmets. They found that riding at 48km/h required 321 watts of power with Brand A helmet but only 298 watts with the Brand B helmet that they settled on. That is a 7.7% decrease in output for the same speed! I’m deliberately not mentioning the brands of helmet because aero helmets can be position / body specific. That means that an aero helmet that is an advantage over other brands for one rider can be a hindrance to another who is of different body shape and who holds a different position on their bike.
If you don’t have access to an indoor velodrome or powermeters, the next best way to refine your ‘aero’ness’ and equipment choices is to pick a test course and keep a diary. Try and ride your test course in more or less repeatable conditions. For instance, early morning / low wind. If you get up one morning and it is windy, jump on the road bike for a training ride instead. In your diary, note down the temperature and conditions and if you ride your course enough and maintain your diary, you should be able to make a well educated guess about which equipment to choose. The only other requirement is to only adjust one parameter at a time, whether it be equipment or position, and test the change multiple times before deciding if it is better or worse.
Sadly, like most other posts on this site, this has been written in haste but I hope that I’m giving you a picture of the variables that make up The Secret of Speed. There is one last matter to cover but but before getting to it, one thing that I haven’t mentioned is that the faster the rider can ride, the more important aerodynamics becomes. When a rider can average 50 kms an hour or more, or something approaching that, they have only 3 requirements.
1. Minimum drag
2. Maximum power
3. Ability to hold the position for the required time.
Jayson held the position in the pics for an hour. He’s not the most flexible guy around (though he’s not bad either) and I doubt that he could hold that position comfortably for the approximately 4.5 hours an Ironman bike leg would take him. So duration of intended effort always plays a part in what is achievable.
Lastly, Functionality: Functionality in the global sense; flexbility, functional stability, good diet, good sleep and a positive attitude make up Functionality. Within the time you have to devote to your sport, don’t spend it all on the bike. Actively work to improve all of the factors above. While there are always individual limits as to what is achievable, most people fail to realise their quest for speed because they don’t take the factors of functionality seriously enough. Too often, this is what holds them back.
Note: Often, more specific answers to your questions can be found in the Comments below or in the eBooks section and FAQ page.
To learn more about bike fit products offered by Steve, click here.
Do you have a bike fit success story? Please go here to share.
Thank you for reading, return to the Blog page here or please comment below.Comments (21)
Comments are closed.






Loved the cartoon Steve. Helped me to recognise my “inner Rod”.
How did you do it?
Hope your enjoying Le Tour although all the crashes have been horrible.
Looks like some interesting mountain stages on the horizon.
G’day Tony,
I’m glad that you liked it. Yes, enjoying the Tour and
keeping fingers crossed that Cadel stays upright and healthy. Mountain
stages will be interesting.
Great post Steve. The tour has been frightening and thankfully, unpredictable. How is the Velotron coming along?
G’day Jerry,
Yeah, fingers crossed that Cadel stays upright. The Velotron?
A bit of a story there. I’ve had a constant problem with comms which was eventually traced back to a damaged switch, probably from me loading or unloading into the car when I picked it up and drove it back from Melbourne.
Only got it in full working order this week. Now I have to learn how to drive it, though I’ve got a reasonable idea, but want more. Sooner or later I’ll put a post up on it. How’s life in Austin?
Thanks Steve – great info.
hi steve,
several coaches and bike fitters speak about the importance of tilting the pelvis forward when riding (e.g., http://www.trainingbible.com/joesblog/2007/09/road-bike-posture.html).
it seems that in order to do this, you almost have to place a higher load on soft tissue. (saddle choice plays a part, of course)
in the video of the elite climber/TT winner in your post above, he seems to have a pretty posteriorly rotated pelvis with the bend occurring in his low back. and obviously he’s pretty successful.
do you agree with the “pelvis tilted forward” concept?
G’day Eric,
Yes, I do agree but the limiting factors are: How functional the rider is, the position that works best for them and seat comfort. No point having an anterior pelvis on the bike if you can’t have children as a result as I’m sure you understand.
This is the gent you mention here http://www.stevehoggbikefitting.com/blog/2011/02/young-rider-works-hard-ben-dyball/ if you want to read his history. In standing posture he doesn’t have a posterior pelvis at all. He’s actually pretty good. On the bike, yes, he can’t get his pelvis flat but most others can’t either, and he’s better than the gent Friel highlighted in that regard. Also too, we’ve found what works best for Ben in TT’s is only minor changes to his road position in terms of seat setback, seat height and upper body position. For instance, the young guy in the still photo below him has a more upright pelvis than Ben when on
the bike. In his case, he is 16 and has just had a large growth spurt when that photo was taken. So his hamstring flexibility is still catching up with the growth in leg length.
So yes, I agree with what you are saying but as always, there are individual limits. Two of the gents higher up in that post have flatter pelvis’s but they are riding in a forward position to achieve it.
Does this sound familiar:
http://www.bikeradar.com/racing/article/aero-position-isnt-everything-31165
G’day Chris,
Thank you very much for that! It’s the first time I’ve ever read anything about aero positioning that accords with my empirical experience with clients.
Hi Steve,
Do you have plans to come to Canada or USA in 2012 for lectures and bike fittings ?
Thanks.
Gaëtan
G’day Gaetan,
Thank you for your interest. I have been talking to some
people in Pennsylvania for some time about a project they have going there. At this stage it is up in the air so it is unlikely that I will be coming. This might change but I can’t see it happening at the moment.
G’day Steve,
another man who “sustain” your claims (that you do not have to place your pelvis/saddle extrem forward) is the top pro rider, many times TT world champion, Fabian Cancellara :). on his bike which has 78 degree seat angle he choose a 50mm offset seat post and his saddle has a 62mm setback. here’s link with his bike:
http://www.cyclingnews.com/features/pro-bike-cancellaras-trek-speed-concept-tour-de-france
salut,
Mircea
G’day Mircea,
Thanks for that. Often the fastest position is not themost aerodynamic one. But then again, there is no prize for the most aerodynamic position, just the shortest elapsed time.
Hi Steve
This is a great topic – the road to TT set up is a minefield which I am just trying to navigate.
I am 193 cm and on a 61 cm P3 with 50 mm set back and around 165 mm drop to the armpads. For 20 km TTs which I am going to be doing it seems comfy (eg I can ride for 30 mins without discomfort and am relaxed). I am very flexible ride pelvis forward normally so it’s not that extreme for me.
It’s the saddle position that has me stumped. I am still messing about but at the moment feeling good with the saddle just under a cm less from the BB to the same position on the saddle on the TT vs road which is about 6 mm higher vertically. You see a lot of guys saying that they are 2 cm+ higher on TT. Depends how you are measuring of course but it doesn’t seem that that the pros change that much road to TT.
Anyway, assuming that my road position is dialled what should be the starting point for TT saddle height from the BB vs my road position and what are the measurement points? For all the reasons you state, I want to get that right for power production then adjust the bars accordingly if necessary rather than be too low just becuase of the bars.
Thanks heaps
Simon
G’day Simon,
Assuming you are happy with your road seat position and
are using the same seat on road and TT bikes, at your height and guesstimating typical seat height, place your seat anywhere from the same setback as your road bike to 20mm further forward than your road bike. Somewhere in that 20mm range is likely to be optimal for you.
Thanks heaps Steve.
What about the height from BB? I assume that it remains the same (so it rises virtually as you come forward)?
Thanks again.
G’day Simon,
Seat height can vary. Assuming the same seat, I would
start at the same height but one of three things may happen.
1. Seat height stays the same
2. Seat height has to drop because the increased forward lean of the torso increases the load on the hamstrings and places a practical limit on seat height.
3. Moving the seat height forward, reduces load on the lower back and hamstrings allowing the seat to rise.
2 and 3 are totally dependent on the functionality of the rider which can be huge variable. I would suggest starting at the same seat height and then performing the uphill test as described in the post ‘Seat Height – How Hard Can It Be?’
Steve
Because the hips rotate forward in the TT position, as you noted in your post, this causes the hip joint to shift upwards a touch (10-15mm) which in effect causes an increase in leg length, correct? If so, I assume what you are saying is that for the same seat, with your advice in the post, the seat height should remain about the same from road to TT bike with the difference being a slight shift forward of the saddle.
This is how I have taken your post and while I get lots of crap about my seat being too low, I don’t seem to have incurred any other adverse issues. I have found that your methodology for finding seat height is much more difficult to apply on a TT bike than a road bike.
Craig
G’day Craig,
I’ve just answered substantially the same question with
Simon Quirk which should be here somewhere in the Comments on this post. Basically start with the same seat height (assuming the same seat) as the road bike and refine by doing the uphill test as described on the post on seat height. Depending on the functionality of the rider and how far they want to push the aero / low torso position, seat height can vary between higher, lower or similar to the road bike for the same rider.
If you’re performing and not getting injured, it is likely that your seat height is fine.
People confuse a higher seat height with higher power output. Often the opposite is the case. One of the things that stands out using the Velotron is that power output drops dramatically if the rider is even 5mm too high at high load. Conversely, if the seat height is gradually lowered from optimal, the drop off in output is far more gradual. Most people sit too high.
But, Steve, I feel more powerful when sitting higher 🙂 I wish I had a dollar for every time I have heard that! My time on Jerry’s velotron showed that I am better much lower than where I feel most “powerful”.
Thanks for the feedback Steve – I have a hard time keeping up with the comments sometimes so I apologize for the redundancy.
G’day Craig,
A corollary to that is “My right leg feels stronger” when
the Velotron shows that the left leg is doing more work! I suppose it means that we are a poor judges of ourselves without a lot of practice and real time feedback.